
Installation & Maintenance Guide
Installing your DIY pizza oven is quick and easy—it comes as a single, fully assembled unit. Follow these steps to get it ready in less than an hour:

Step 1: Prepare the Base
Mix the provided "insulation under base" with water until it forms a moldable
consistency.Spread the mixture evenly, ensuring a thickness of 20mm at the back and 15mm at the front to create a slight downward angle.

Step 2: Place the Oven
Position the fully assembled oven on the prepared insulation base, ensuring it is stable and level.
Leave expansion gaps open for proper heat distribution.

Step 3: Finish with Grout
Mix the provided grout with bonding liquid to a smooth consistency.
Smooth the grout around the base edges for a neat finish
.Leave a 10mm gap for wall installations to avoid cracking.

Curing Procedure
Day 1: Heat the oven to 140°F (60°C) for 2-3 hours.
Day 2: Increase to 215°F (100°C) for 2-3 hours.
Day 3: Heat to 300°F (150°C) for 2-3 hours.
Day 4: Raise to 400°F (200°C) for 2-3 hours.
Day 5: Finish at 480°F (250°C) for 2-3 hours.

Maintenance Tips
Operating Temperature: Keep the oven below 350°C for optimal performance.
Moisture Protection: Avoid washing the interior and keep the door closed during wet weather.
Crack Management: Hairline cracks are normal. Fill larger cracks with mortar if needed.
Wood Quality: Use dry, seasoned wood to minimize smoke.
Regular Care: Repaint or touch up as needed to maintain aesthetics.
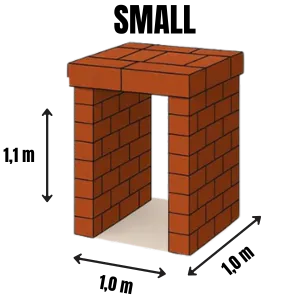
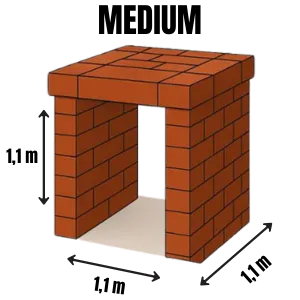
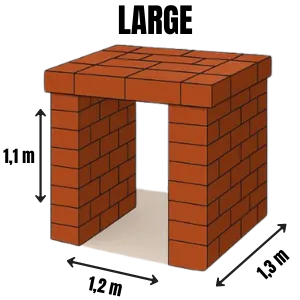
Recommended DIY Oven Stand Sizes
Contact Us
31 Springbok Ave, Ardenwold AH
Vanderbijlpark, 1911
083 438 1485/ 016 013 0411